How Illuminated Tact Switches Work: The Definitive Technical Guide
Understanding how does an illuminated tact switch work is the first step in designing intuitive, user-friendly electronic interfaces. Whether you are building high-end audio equipment or industrial control panels, the integration of tactile feedback with visual cues is a game-changer. This guide breaks down the mechanics, the circuitry, and the engineering behind these essential components.
What Is an Illuminated Tact Switch?
An illuminated tact switch is an electromechanical component that combines a momentary tactile switch with an integrated LED (Light Emitting Diode) within a single housing. When the actuator is pressed, it provides physical "click" feedback to the user while simultaneously offering visual illumination, which can function as a status indicator, a backlight for low-light conditions, or an aesthetic accent.
The Convergence of Light and Haptics
In my years working with interface components, I have found that users crave confirmation. A standard switch tells your finger the job is done. An illuminated switch tells your eyes the system received the command.
To truly grasp this, you first need to understand the base component. At its core, this device relies on the architecture of a standard what is a tact switch. It uses a metal dome for conductivity and haptics. However, the illuminated version introduces a complex layer of optical engineering. The housing must accommodate the LED without compromising the tactile feel or the component's footprint.
How Does an Illuminated Tact Switch Work Mechanically?

Mechanically, an illuminated tact switch works by using a plunger to collapse a metal dome against a contact pad, closing the electrical circuit. The LED component is mounted independently within the switch structure or on the PCB below it. Light travels through a translucent actuator or a "light pipe" to be visible to the user, operating either continuously or only when the switch is actuated.
The Step-by-Step Actuation Process
The magic happens in milliseconds. Here is the breakdown of the physical action:
- Force Application: You apply force to the button top (actuator).
- Dome Collapse: The actuator pushes down on a convex metal dome (usually stainless steel or phosphor bronze).
- The Snap: The dome inverts. This creates the crisp "click" feeling and sound.
- Contact Closure: The center of the dome touches the fixed contact points on the switch base.
- Signal Transmission: Current flows between the pins, sending a signal to your microcontroller.
- Release: You remove pressure. The dome’s elasticity snaps it back to the original shape, breaking the circuit.
For a deeper dive into the physics of the metal dome and contact resistance, you should review exactly how tact switch works in non-illuminated scenarios. The principles remain the same, but the geometry changes to allow light to pass through.
How Is the LED Integrated into the Circuit?
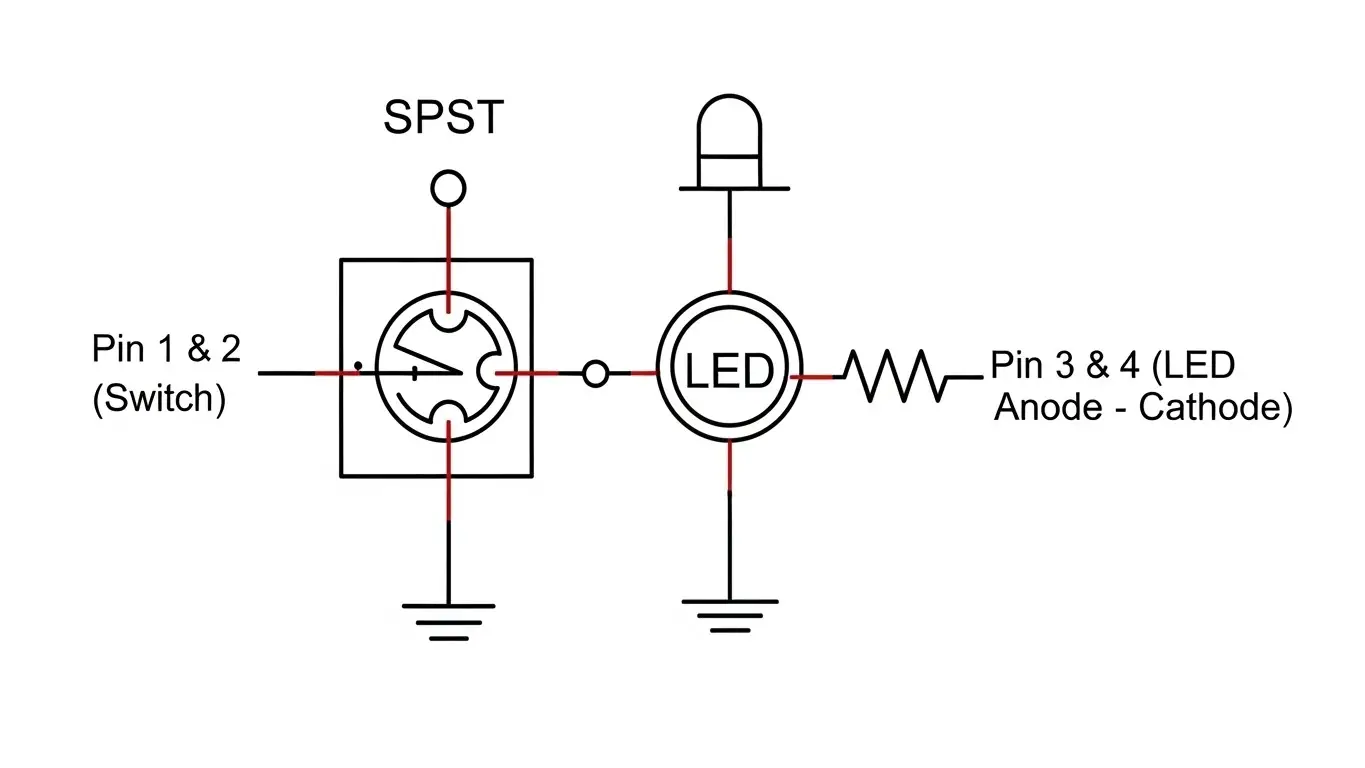
The LED in an illuminated tact switch usually has a separate circuit path from the switching mechanism. This allows the light to be controlled independently by the device's firmware (e.g., blinking, always on, or reacting to the press). The LED terminals (anode and cathode) are distinct from the switch terminals, requiring specific PCB routing to manage both the logic signal and the LED power.
Circuit Topologies
When designing your PCB, you will typically encounter two types of LED integration:
- Integrated (Embedded) LED: The LED die is built directly inside the switch housing. This is compact but limits you to the manufacturer's color options.
- Through-Hole/SMD Mounted LED: The switch has a hollow center or a cutout. You mount a separate LED on the PCB, and the switch sits over it. This gives you total control over LED brightness and color.
I often advise engineers to treat the LED and the Switch as two different components that just happen to be roommates. You must calculate current limiting resistors for the LED just as you would for a standalone light.
Typical Pin Configuration
| Pin Number | Function | Connection |
| Pin 1 & 2 | Switch Contacts | Connect to GPIO / Ground |
| Pin 3 | LED Anode (+) | Connect to VCC (via Resistor) |
| Pin 4 | LED Cathode (-) | Connect to Ground |
What Types of Illumination Styles Are Available?
Illuminated tact switches offer three primary lighting styles: full-face illumination, where the entire cap glows; ring illumination, featuring a glowing circle around a non-illuminated center; and symbol illumination, where a specific icon is laser-etched onto a painted cap, allowing light to shine only through the icon.
Choosing the Right Aesthetic
The style you choose dictates the user experience.
- Full Face: Great for emergency stops or main power buttons. It is impossible to miss.
- Ring/Halo: This offers a sophisticated, modern look. We see this often in consumer electronics and automotive dashboards.
- Symbol: This is critical for usability. If you have a "Mute" button, illuminating a microphone icon is far more intuitive than just a glowing dot.
How Do Environmental Factors Affect These Switches?
Environmental factors like dust, moisture, and vibration can disrupt the optical clarity and electrical contact of illuminated switches. To combat this, manufacturers use sealing methods such as O-rings, epoxy seals, or ultrasonic welding. IP-rated switches protect both the LED contacts and the dome mechanism from corrosion and short circuits caused by water or debris.
The Importance of Sealing
If you are designing for a clean server room, a standard switch is fine. But if you are building a controller for a marine boat or an outdoor kiosk, you must look at protection.
Contaminants can do two things:
- Block the contact pads (switch failure).
- Short the LED pins (lighting failure).
For outdoor applications, I always recommend looking into a sealed tact switches guide. These prevent dust ingress. If your device faces rain or wash-downs, you must upgrade to fully waterproof tactile switches explained to meet IP67 or IP68 standards.
DIP vs. SMT: Which Mounting Style Is Better for Illumination?
For illumination, SMT (Surface Mount Technology) is generally better for high-density, automated production and low-profile designs. However, DIP (Through-Hole) switches offer superior mechanical stability for heavy-use buttons and are often easier to prototype with. The choice depends on your PCB layout constraints and the mechanical stress the switch will endure.
Through-Hole (DIP)
DIP switches are the tanks of the switch world. They go through the board and are soldered on the back. This is great for stability. If you want to understand the legacy and utility of these, look at tact dip switch fundamentals.
Surface Mount (SMT)
SMT switches sit on top of the board. They are smaller and cheaper to assemble. For illuminated versions, SMT allows for "side-firing" LEDs that shine horizontally, which is excellent for edge-lit applications.
Key Benefits of Using Illuminated Tact Switches
Why go through the trouble of routing extra traces for LEDs? Here is why:
- Low Light Usability: Essential for automotive interiors and medical devices used in darkened rooms.
- Status Indication: The light can change color (RGB) to indicate system health (Green = Good, Red = Error).
- Space Saving: Combining the light and the switch saves valuable PCB real estate compared to having a separate LED next to a switch.
- Aesthetics: Let's be honest—products with good lighting simply look more premium.
Frequently Asked Questions
Yes, if you use an RGB illuminated tact switch. These contain Red, Green, and Blue diodes within a single package. By varying the voltage to each pin, you can mix these to create almost any color. Standard switches usually come in single static colors like Red, Blue, or White.
Generally, no. The mechanical life of the switch (often 100,000 to 1 million cycles) is determined by the metal dome. The LED is a solid-state component with a much longer lifespan (often 50,000+ hours). However, over-driving the LED voltage can cause it to burn out before the switch fails mechanically.
No. Most standard illuminated switches are rated IP40 (protected against solid objects >1mm, but no water protection). You must specifically specify IP67 or IP68 rated switches if you need protection against moisture, rain, or immersion.
Not necessarily. The actuation force (measured in gram-force, gf) is determined by the metal dome, not the LED. However, some illuminated caps are heavier or have a longer travel distance to accommodate the light pipe, which can slightly alter the perceived feel of the click.
A tact switch is almost always momentary, meaning it is only "On" while you press it. The light might stay on, but that is controlled by software. A latching switch physically stays down when pressed (like a ballpoint pen). Illuminated tact switches are rarely latching; they rely on logic controllers to handle the "On/Off" state.