Tact Switch Not Clicking? Fix Guide
If your tact switch is not clicking, the metal dome inside the housing has likely collapsed due to metal fatigue or is physically obstructed by sticky debris (like spilled liquid). When the "click" disappears—often described as the button feeling "mushy"—the tactile feedback is gone, and the switch often fails to close the electrical circuit. The most reliable fix is to desolder and replace the switch entirely. However, if you cannot replace it immediately, you can sometimes restore function temporarily by flushing the mechanism with high-purity isopropyl alcohol to remove internal obstructions.
H2: Why Tactile Switches Lose Their "Click"
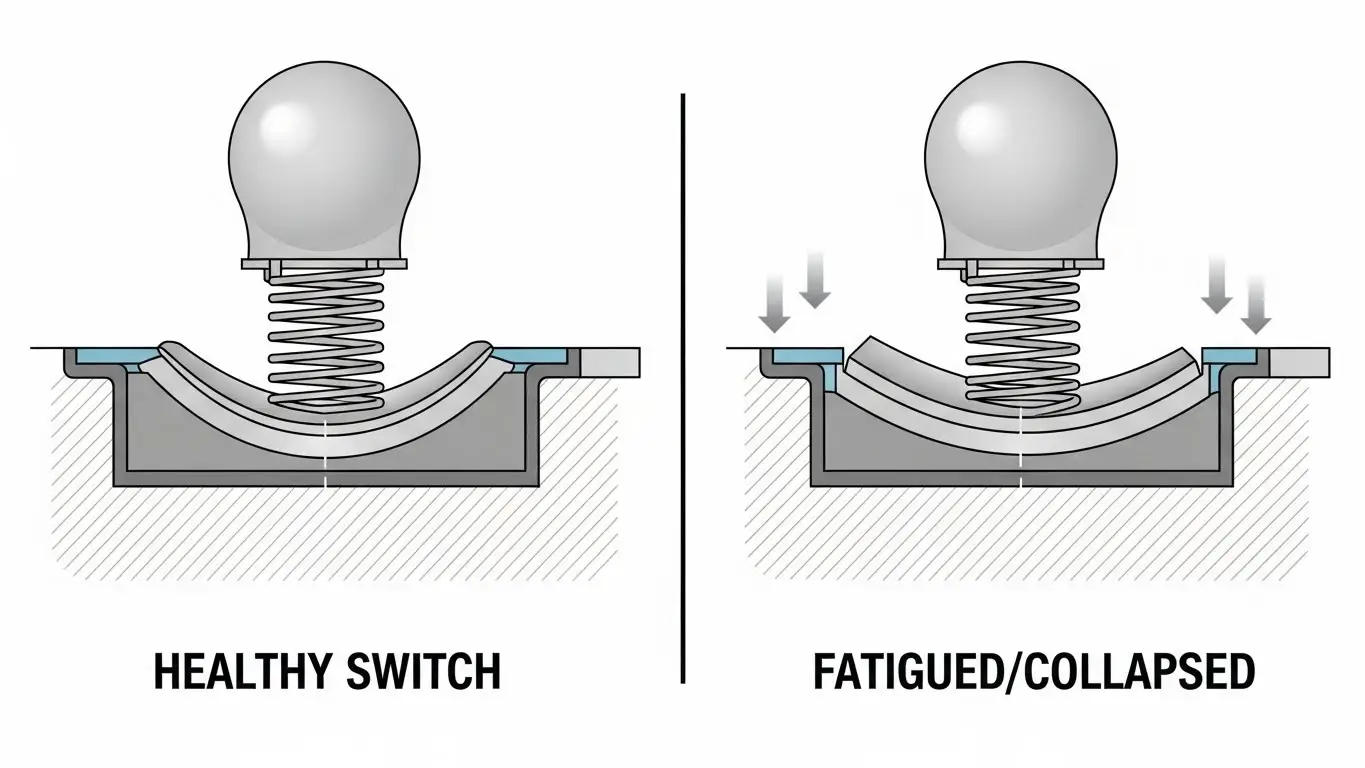
To fix the problem, you need to understand what makes the sound. The "click" in a tactile switch comes from a curved metal disc (the snap dome) inverting when you press it.
H3: Metal Fatigue (The Dome Collapse)
Tact switches are rated for a specific number of cycles (presses). Once a switch exceeds its life expectancy—or if it is pressed too hard—the metal dome permanently deforms. It loses its springiness and stays flat. In this case, no amount of cleaning will bring the click back; the physical component is broken.
H3: Contamination and "Sticky" Buttons
Sometimes the dome is fine, but it can't move. If a sugary drink or thick oil gets inside the switch housing, it acts like glue. The button feels soft or stuck because the residue prevents the dome from snapping back up.
For a deeper dive into how internal corrosion affects performance beyond just the physical feel, check out our article on why your tact switch isn't working.
H2: How do you fix a stuck tactile button?
The best way to fix a stuck or non-clicking button without desoldering is to clean it with a solvent that evaporates quickly.
If the issue is debris rather than metal fatigue, you can try this "flush" method:
- Remove Power: Unplug the device and remove batteries.
- Apply Solvent: Use 99% Isopropyl Alcohol or a specialized contact cleaner (like DeoxIT). Do not use water or standard WD-40.
- Flush the Gap: Drip a small amount of the fluid into the gap around the button actuator.
- Actuate Repeatedly: Rapidly press the button 50-100 times. The solvent dissolves the gunk, and the mechanical action helps work it out.
- Dry Thoroughly: Allow the switch to dry for at least 30 minutes before powering on.
H2: Can you repair a tact switch without soldering?
You can attempt a chemical cleaning, but you cannot physically repair a collapsed metal dome without soldering.
Most tactile switches are sealed or crimped shut. You cannot open them to replace just the internal spring without destroying the housing. If the "flush" method described above doesn't restore the click, the component is mechanically dead.
At this point, you must remove the old switch from the circuit board and solder in a new one. While this sounds intimidating, it is a standard procedure. For safety tips and tool recommendations, refer to our guide on advanced troubleshooting and repair.
H2: Replacing the Switch (The Permanent Fix)
If cleaning failed, replacement is the only option. Here is how to do it.
H3: Tools You Will Need
- Soldering Iron (set to approx. 350°C)
- Desoldering Pump (Solder Sucker) or Desoldering Braid
- Replacement Tact Switch (Ensure measurements match, commonly 6x6mm)
- Flux
H3: The Replacement Steps
- Identify the Pins: Locate the 4 pins of the switch on the underside of the PCB.
- Remove Old Solder: Add a little fresh solder to the joints (helps heat transfer), then use your desoldering pump to suck the molten solder away.
- Pull the Switch: Gently pull the switch out. If it sticks, apply heat to the stuck pin while pulling.
- Install New Switch: Insert the new component. It should snap flat against the board.
- Solder: Apply heat to the pad and pin, feed in a small amount of solder, and let it cool.
H2: Comparing Repair Options: Cleaning vs. Replacing
Is it worth trying to save the old switch?
| Feature | Cleaning (Alcohol/DeoxIT) | Full Replacement |
| Cost | Very Low (Household items) | Low (New switch < $1) |
| Difficulty | Easy (No tools required) | Moderate (Requires soldering) |
| Success Rate | Low (30-40%) | High (100%) |
| Longevity | Short-term (Weeks/Months) | Long-term (Years) |
| Best For | Sticky/Dirty buttons | Collapsed/Fatigued buttons |
Frequently Asked Questions
A: This indicates the metal dome has fatigued (lost its curve) but is still conductive enough to touch the bottom pad when you mash it down. It is on the verge of total failure.
A: No. Standard WD-40 leaves an oily residue that attracts dust and is non-conductive, which can ruin the switch contacts. Only use "Electrical Contact Cleaner" or Isopropyl Alcohol.
A: No. They vary by size (6x6mm is common), height, and "actuation force" (how hard you have to press). Always measure your old switch before buying a replacement.
A: You can test the switch with a multimeter set to "continuity" mode. If the meter beeps when you press the button (even if it doesn't click), the switch is electrically fine. If no beep, the switch is dead.
Key Takeaways
- No click usually means broken metal: If the snap sound is gone, the internal dome has likely collapsed permanently.
- Cleaning is a temporary fix: Isopropyl alcohol can fix sticky buttons caused by spills, but it cannot fix metal fatigue.
- Don't use oil: Avoid standard WD-40; it will ruin the electronics.
- Soldering is the solution: The only 100% reliable fix for a non-clicking switch is desoldering it and installing a new unit.
Conclusion
A tactile switch that doesn't click is a frustrating user experience that usually leads to total device failure. While a quick flush with contact cleaner might buy you some time, you should prepare to replace the component. Since these switches are inexpensive, swapping them out is the most effective way to restore your device to like-new condition.
If you are ready to tackle the repair but need to ensure the rest of your board is safe, review our protocols in advanced troubleshooting and repair before heating up your soldering iron.