The Simplest Way to Test a Tact Switch
The simplest way to test a tact switch is by using a digital multimeter set to "Continuity Mode" (the setting with the sound wave symbol). Connect the black and red probes to the switch terminals on opposite sides. When the switch is open (unpressed), the multimeter should stay silent (reading "OL"). When you press the button, the multimeter should beep immediately and display a value close to zero (0.00).
If you do not have a multimeter, you can build a simple "pass-fail" test using a coin cell battery (CR2032) and a small LED. Tape one leg of the LED to the battery, and use the switch to bridge the gap for the second leg. If the LED lights up when pressed, the switch works.
What Tools Do You Need for Testing?
Before you start tearing apart your device, you need to gather a few basic tools. Testing electronics is 90% preparation and 10% measurement.
Essential Gear
- Digital Multimeter: Any cheap model will do, as long as it measures resistance (Ohms) or Continuity.
- Alligator Clips (Optional): These are a lifesaver. Holding two probes and pressing a tiny button at the same time requires three hands. Clips hold the probes for you.
- Magnifying Glass: To see the tiny pins on Surface Mount (SMD) switches.
If you are new to identifying these components, especially if they are mixed in with other controls, start by reading our Introduction to Tact Switches to understand the anatomy of what you are testing.
How to Test a Tact Switch with a Multimeter (Step-by-Step)
This is the professional method. It gives you a definitive answer on whether the switch is making a clean electrical connection.
Step 1: Isolate the Switch
If the switch is already soldered onto a circuit board, ensure the device is completely powered down. Remove batteries and unplug cables. Testing a live circuit can damage your multimeter. For more on handling PCB components safely, check our guide on What Beginners Should Know About PCB Switches.
Step 2: Set to Continuity
Turn your multimeter dial to the continuity symbol (usually looks like a wifi signal or sound wave). Touch your probes together; if it beeps, you are ready.
Step 3: Connect the Probes
Touch the probes to two legs of the switch.
- For 2-pin switches: Touch one probe to each leg.
- For 4-pin switches: You must touch pins that are not internally connected (more on this below).
Step 4: Press and Listen
While holding the probes steady, press the button actuator.
- Beep = Good: The circuit is closed.
- No Beep = Bad: The switch is broken or oxidized.
How Do I Test a 4-Pin Tact Switch? (PAA)
To test a 4-pin tact switch, you must connect your probes across the "gap," not along the shared rail. In most 4-pin switches, pins 1 & 2 are permanently connected, and pins 3 & 4 are permanently connected. The switching action happens between the 1-2 pair and the 3-4 pair.
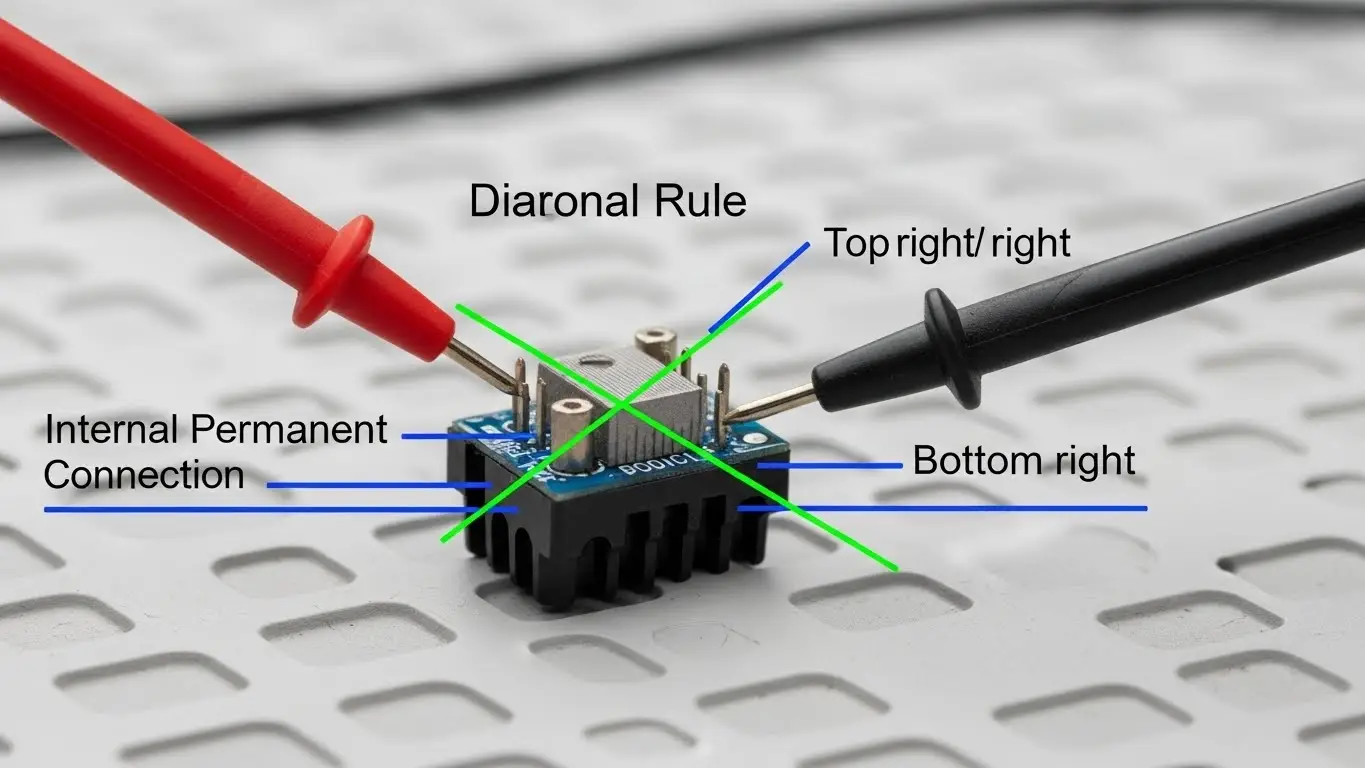
The "Diagonal Rule"
The easiest way to ensure you are testing the correct pins without looking at a datasheet is to place your probes diagonally. Touch the top-left pin and the bottom-right pin. This guarantees you are crossing the switching mechanism.
If you are confused about pin layouts in general, this logic is different from configuration switches. You can compare this to the layout described in our How DIP Switches Are Used in Basic Electronics guide.
What If the Switch Clicks But Doesn't Work? (PAA)
If a switch clicks but doesn't work, the internal metal dome has likely suffered from oxidation or contamination. The "click" is purely mechanical (the metal buckling), but the electrical signal relies on clean contact surfaces.
Why "The Click" Lies
I have seen countless switches that sound crisp but fail to send a signal. This is common in humid environments where an oxide layer forms on the copper contacts inside. The metal dome collapses (click), but electricity cannot pass through the corrosion (no signal).
For devices used in harsh environments, standard testing might reveal frequent failures. In these cases, you should learn about ruggedized options in our Industrial Switches Comprehensive Guide.
Can I Test Without Desoldering the Switch? (PAA)
Yes, you can usually test a tact switch while it is still soldered to the board, provided the device is powered off. However, other components on the board (like capacitors or resistors) can sometimes interfere with the reading, giving you a "false positive" beep.
The "False Continuity" Warning
If you measure across a switch on a complex board and hear a continuous beep before you press the button, the switch is either shorted (stuck ON) or the circuit board allows current to flow around the switch. In this case, you must desolder at least one leg to test it accurately.
This troubleshooting logic is similar to verifying address settings on other components. If you are comfortable with multimeter checks, you might also find our Beginner’s Guide to DIP Switch Configuration useful for troubleshooting logic levels.
Interpreting Resistance Values
Sometimes continuity isn't enough. If your switch works but acts "glitchy," switch your multimeter to Resistance (Ohms/Ω) mode.
| Reading | Status | Diagnosis |
| 0.0Ω - 0.5Ω | Perfect | Excellent condition. |
| 1.0Ω - 10Ω | Wear | Usable, but might cause signal errors. |
| > 10Ω | Failure | High resistance; the device will ignore the press. |
| OL (Over Limit) | Broken | No connection at all |
Frequently Asked Questions
No, standard tact switches are non-polarized. You can connect the red and black probes to either side, and the test result will be the same.
While you can try spraying contact cleaner (DeoxIT) into the housing, this is usually a temporary fix. Tact switches are sealed units and are very cheap; the best fix is always to desolder the old one and replace it with a new one.
If the multimeter beeps before you press the button, you are either testing the wrong pins (the permanently connected rail) or the switch has failed in the "Closed" (stuck) position.
Yes! The continuity test works exactly the same for DIP switches. You can learn more about verifying those specific configurations in our Beginner’s Guide to DIP Switch Configuration.
Key Takeaways
- Use Continuity Mode: The "beep" setting on your multimeter is the fastest way to test.
- Test Diagonally: On 4-pin switches, test opposite corners to ensure you are crossing the circuit.
- Ignore the Click: A mechanical click does not guarantee an electrical connection; always verify with a tool.
- Power Off: Never test continuity on a powered circuit board.
Conclusion
Testing a tact switch is a fundamental skill for anyone repairing electronics. Whether you are fixing a car key fob or a washing machine interface, the process is always the same: isolate, connect, and listen for the beep.
If your test confirms the switch is dead and you need to understand exactly what specs to look for in a replacement, head over to our Introduction to Tact Switches for a complete breakdown of actuation force and travel distance.