Introduction to Tact Switches: The Mechanics of the "Click"
This introduction to tact switches covers everything from basic mechanics to selecting the right component for your PCB. You likely press a dozen tactile switches every day without realizing it. They are the hidden heroes behind the "Volume Up" on your remote, the "Reset" on your router, and the "Start" on your microwave.
While simple in appearance, these switches require specific engineering knowledge to implement correctly. I recall my first prototype failure; I chose a switch with the wrong actuation force. The user interface felt "mushy," and the product felt cheap. The switch defines the user experience.
What Exactly Is a Tactile Switch?
A tactile switch (tact switch) is a momentary electromechanical switch that provides physical feedback to the user when actuated. When you press it, a metal dome collapses to bridge two electrical contacts, creating a short circuit. Once released, the dome snaps back, breaking the circuit and producing a distinct "click" sound and feel.
The "Pulse" of Electronics
Unlike latching switches that stay on or off (like a light switch), a tact switch is "momentary." It is only active while you press it. This makes it perfect for sending signals to a microcontroller—like typing a character or resetting a device.
There is often confusion between momentary inputs and configuration settings. If you are looking for switches designed to "set and forget" hardware addresses rather than send momentary pulses, you should read our Beginner’s Guide to DIP Switch Configuration. While tact switches handle user input, DIP switches handle system logic.
How Does the Internal Mechanism Work?
The mechanism relies on a curved metal dome, usually stainless steel or phosphor bronze, sitting above two conductive contacts. When pressure is applied to the actuator (plunger), the dome inverts (buckles). This inversion connects the separate contacts on the base, completing the circuit. Removing pressure allows the dome to spring back instantly.
Anatomy of a Click
The satisfying "snap" isn't just for show; it's a critical confirmation signal. In professional circles, we talk about the "Click Ratio." A higher ratio feels sharper; a lower ratio feels softer.
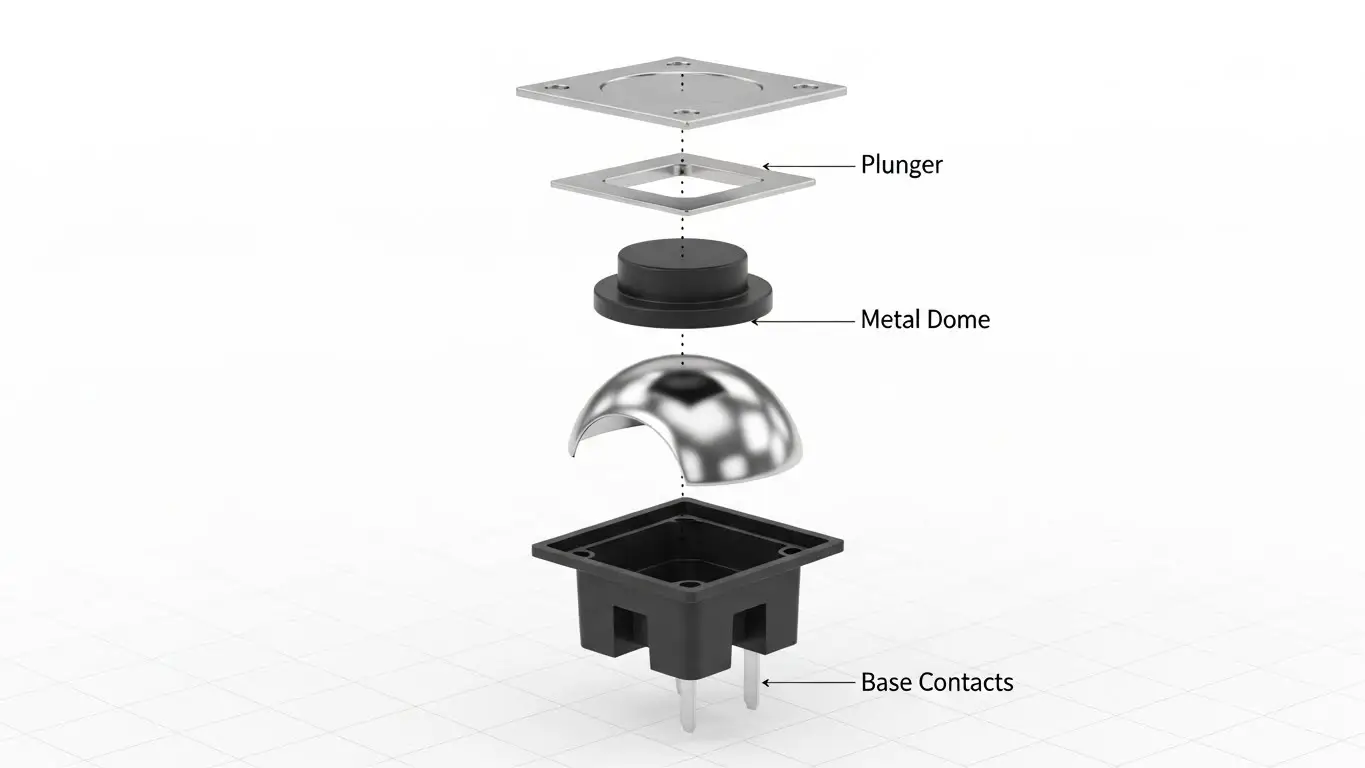
The Four Core Components:
- The Cover: Usually metal or plastic, holding the assembly together.
- The Plunger: The interface between your finger and the dome.
- The Contact Dome: The heart of the switch that provides the spring action.
- The Base: A molded resin housing containing the terminals.
[External Link Placeholder: Diagram of Tact Switch Internal Construction]
What Are the Key Specifications You Must Know?
The most critical specifications are Actuation Force (measured in gram-force, gf), Travel Distance (mm), and Life Cycle (number of operations). Standard forces range from 100gf (soft) to 260gf (stiff). Travel is typically short, between 0.25mm and 0.50mm, allowing for rapid data entry without fatigue.
Decoding the Datasheet
When sourcing parts, you cannot ignore the specs. A switch meant for a rugged industrial controller needs different specs than one for a consumer toy.
| Specification | Typical Value | Why It Matters |
| Actuation Force | 160gf ± 50gf | Determines how "hard" you must press. 160gf is standard; 260gf prevents accidental presses. |
| Travel | 0.25mm | Short travel allows for rapid double-clicking. |
| Life Cycle | 100k - 1M cycles | High-use devices (game controllers) need 1M+ cycles. |
| Contact Rating | 50mA @ 12V DC | Exceeding this burns out the contacts. Never run high power through a tact switch. |
For applications requiring extreme durability beyond standard electronics, such as heavy machinery controls, refer to the environmental standards discussed in our Industrial Switches Comprehensive Guide.
Tact Switch vs. Push Button: What’s the Difference?
The main difference is size, current capacity, and feedback. Tact switches are designed for low-voltage signal currents (logic levels) and always offer a "click." Standard push buttons can handle higher currents, may not provide tactile feedback, and are often much larger physically.
Choosing the Right Tool
I’ve seen junior engineers try to use a tiny 6x6mm tact switch to turn on a motor directly. The switch melted instantly.
- Tact Switch: Used for logic signals (5V, 3.3V). Connects to a CPU or MCU. Small footprint.
- Push Button: Can sometimes handle power loads. Larger footprint. May be "soft" (no click).
What Are the Common Sizes and Mounting Styles?
The industry standard size is 6x6mm, but sizes range from ultra-miniature 2x3mm to larger 12x12mm. Mounting styles include Through-Hole (THT) for manual soldering durability and Surface Mount (SMD) for automated high-density assembly.
1. Through-Hole (THT)
These have legs that go through the PCB.
- Pros: Strong mechanical bond. Harder to rip off the board if the user pushes too hard.
- Cons: Takes up space on both sides of the board.
2. Surface Mount (SMD)
These sit flat on the top of the board.
- Pros: Great for automated pick-and-place machines. Saves space.
- Cons: Can shear off if subjected to high lateral force.
3. Right Angle
The actuator points sideways. These are essential when the button needs to be accessible from the edge of a device case.
How to Avoid Common Tact Switch Failures?
Common failures include contact bounce (double signals), contamination (dust/moisture), and soldering heat damage. "Bounce" occurs when the metal dome vibrates upon closing, causing the microcontroller to read multiple clicks. This requires software "debouncing" or hardware capacitors to fix.
The "Melting" Incident
One specific tip from experience: Watch your soldering temperature. The internal housing of cheap tact switches is often plastic. If you hold your iron on the pin too long, the plastic softens, the pin shifts, and the dome inside becomes misaligned. The result is a switch that "clicks" but doesn't send a signal.
Pro Troubleshooting Checklist:
- Is it sealed? If you are using a wash process during manufacturing, use IP67 sealed switches. Flux residue kills unsealed switches.
- Is it bouncing? If one press registers as two, add a 10ms delay in your code (software debounce).
- Is the force correct? If users complain the button is "stuck," it might just be too stiff (high gf) for the button cap design.
Applications: Where Do We Use Tact Switches?
Tact switches are ubiquitous in consumer electronics, automotive dashboards, medical instrumentation, and telecommunications. They are the primary interface for any device requiring menu navigation, volume adjustment, or mode selection.
Real-World Examples
- Automotive: The buttons on your steering wheel. These often require higher actuation force (300gf+) to prevent accidental presses while driving.
- Audio Equipment: The input selectors on a mixer. These need a crisp click so the sound engineer knows the change happened without looking.
- IoT Devices: The pairing button on a smart bulb.
If you are building a complex control panel that utilizes both momentary inputs and permanent settings, you will likely need a mix of components. Remember to pair your user-facing tact switches with board-level configuration tools. You can learn how those back-end settings work in our Beginner’s Guide to DIP Switch Configuration.
Final Thoughts on Selection
This introduction to tact switches should give you the confidence to move beyond generic parts. The difference between a premium product and a cheap gadget often comes down to the quality of the switch.
Don't just pick the cheapest 6x6mm button you find. Consider the "feel," the life cycle, and the environment.
For a broader look at how these small components fit into the larger world of electromechanical systems, especially in harsh environments, make sure to read our Industrial Switches Comprehensive Guide.
Frequently Asked Questions
"Tact" is short for tactile. It refers to the physical feedback—the distinct "click" or snap—that the user feels through their finger when the switch is successfully actuated.
Yes, but typically not directly for high power. Tact switches are used to send a "wake up" signal to a microcontroller or power management IC, which then turns on the main power. They cannot handle high current directly.
This is called switch bounce. You can fix it by adding a small capacitor across the switch terminals (hardware debouncing) or by adding a small delay (10-20ms) in your firmware code (software debouncing) to ignore the rapid signal noise.
No, standard tact switches are not waterproof. If your device will be used outdoors or washed, you must specify IP67-rated or "sealed" tact switches to prevent moisture and dust from corroding the internal dome.
Actuation force is the pressure required to collapse the dome and make contact. Return force is the strength of the dome pushing back up. A good ratio between these two ensures the switch doesn't get stuck down.