DIP Switch vs Jumper: Which Is Better?
There is a distinct sinking feeling known only to field technicians: the sound of a plastic jumper slipping from your needle-nose pliers and pinging off the metal chassis of a mission-critical control panel. You’re on a factory floor, it’s 100 degrees, and you’re now searching for a piece of plastic the size of a grain of rice while production is halted.
If you’ve lived this moment, you already know why the debate of DIP switch vs jumper matters.
While both components serve the same fundamental purpose—configuring electronic circuits—they sit at opposite ends of the usability spectrum. For PCB designers and industrial integrators, the choice between them isn't just about cost; it’s about the "User Experience" of the hardware.
In this guide, we’ll break down the technical differences, cost implications, and reliability factors of these two components, with a specific focus on why modern industrial electronics are shifting towards one over the other.
What is the Main Difference Between a DIP Switch and a Jumper?
The primary difference is usability versus cost. A jumper is a passive metal bridge that manually shorts two pins to close a circuit; it is inexpensive ($0.01) but difficult to change and easy to lose. A DIP switch (Dual In-line Package) is a bank of manual electromechanical switches that allows for easy, tool-free configuration, but costs significantly more ($0.50–$1.00+) and takes up more board space.
The Technical Breakdown
To truly understand the trade-off, we have to look at the mechanics.
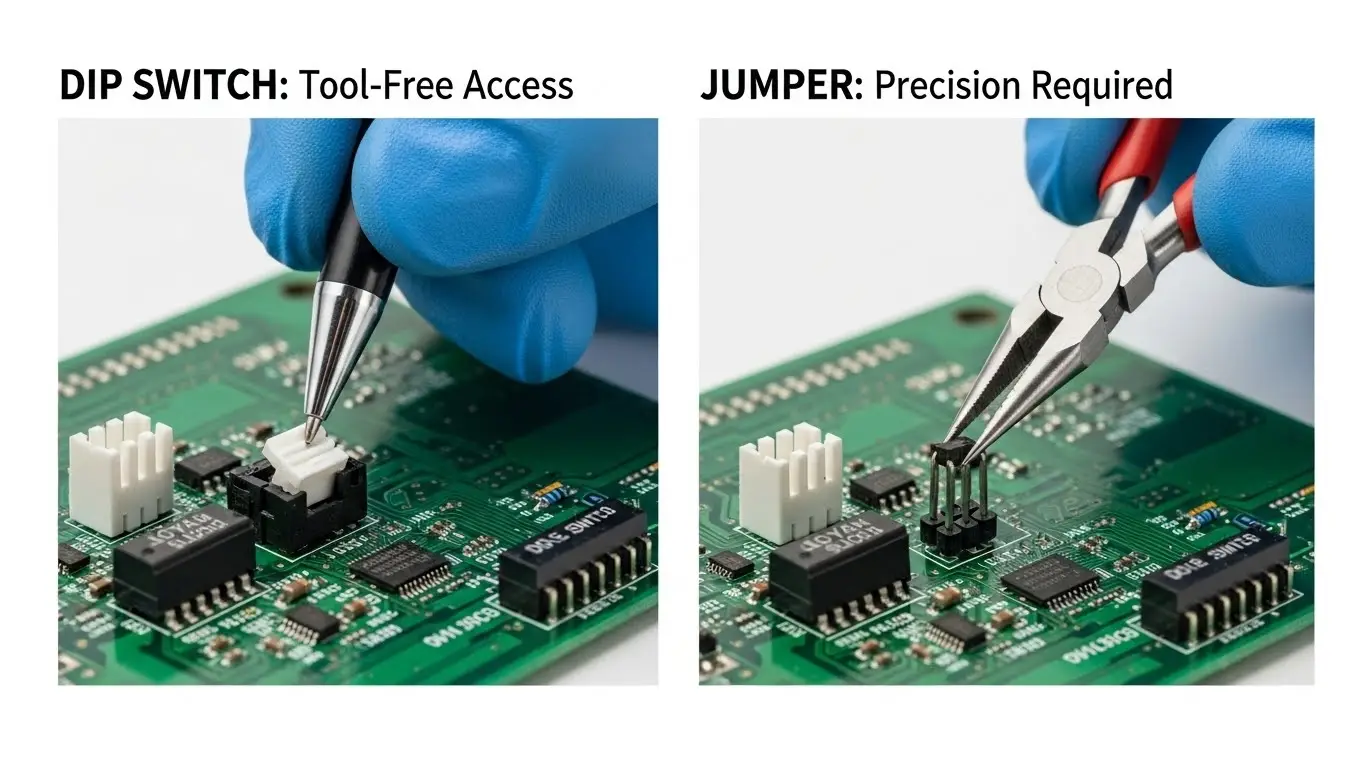
- The Jumper (Header & Shunt):This is the "Keep It Simple, Stupid" (KISS) solution. You have two metal pins (the header) soldered to the PCB. To "turn on" the feature, you place a plastic-encased metal clip (the shunt) over both pins.
- Mechanism: Physical short.
- Tools Required: Tweezers or needle-nose pliers (usually).
- Best For: Settings that are set at the factory and never touched again (e.g., voltage selection).
- The DIP Switch:Think of this as a miniature version of the light switches in your house, shrunk down to fit on a circuit board. They come in "banks" of 2, 4, 8, or more switches.
- Mechanism: Electromechanical contact (sliding or rocking).
- Tools Required: None (sometimes a small screwdriver for recessed types).
- Best For: Settings that a user might need to change in the field (e.g., device addresses, baud rates, or network modes).
DIP Switches in Industrial Ethernet: Why Are They Used?
DIP switches allow for "plug-and-play" configuration of complex network features without software. In the world of industrial switch comparisons, you will often see "Unmanaged Switches with DIPs." These allow a technician to enable features like Broadcast Storm Protection or QoS (Quality of Service) simply by flipping a switch, rather than connecting a laptop and navigating a web interface.
The "Unmanaged Plus" Advantage
For industrial automation, uptime is everything. If a switch fails at 3:00 AM, the replacement unit needs to be installed immediately.
- With Software/Jumpers: The technician must find a laptop, the correct console cable, and the documentation to re-program the switch. Or, they have to risk dropping jumpers while fiddling with a PCB.
- With DIP Switches: The technician looks at the old switch, mimics the DIP switch positions on the new unit, plugs it in, and walks away.
Field Note: Many modern industrial switches, such as those found in high-performance automation setups, use DIP switches specifically to bridge the gap between "dumb" unmanaged switches and complex managed switches. It empowers the site electrician to handle configurations that previously required an IT specialist.
Pros and Cons of Jumpers (The "Set and Forget" Champion)
Jumpers are the gold standard for permanence and low cost. If you are designing a board where a setting will be chosen during manufacturing and never touched again, jumpers are the superior choice.
Advantages
- Cost Efficiency: They are virtually free in the context of a Bill of Materials (BOM).
- Signal Integrity: A jumper is a solid piece of metal. It has near-zero resistance and is less susceptible to contact oxidation than a cheap switch.
- Vibration Resistance: Once a jumper is seated (and if the header pins are high quality), it is very difficult for vibration to "shake" it loose. It requires a specific pulling force to remove.
Disadvantages
- The "Lost Part" Problem: As mentioned in the intro, if you drop a jumper shunt, it is gone. In a high-voltage cabinet, a loose piece of conductive metal is also a safety hazard.
- High Labor Cost for Users: Changing a jumper requires opening the enclosure, finding tools, and having manual dexterity. It is not "user-friendly."
- Documentation Nightmares: It is often unclear which position is "ON" or "OFF" without a datasheet.
Pros and Cons of DIP Switches (The Field Technician's Friend)
DIP switches are the superior choice for User Experience (UX) and field serviceability. They add "perceived value" to a product because they make the device feel professional and configurable.
Advantages
- Visual Status: You can look at a DIP switch bank and immediately read the configuration (e.g., "On-Off-Off-On") without touching it.
- No Loose Parts: Everything is contained. You cannot lose the "switch."
- Safe Field Configuration: A technician can often flip a DIP switch with a gloved hand or a pen tip without risking contact with live circuits or dropping parts.
Disadvantages
- Cost: They are significantly more expensive than headers.
- Mechanical Wear: They have a finite life cycle (usually 1,000–3,000 cycles). However, for configuration settings, this is rarely reached.
- Dirt Ingress: Standard open DIP switches can accumulate dust, which interferes with the contacts. Solution: Use tape-sealed or IP-rated DIP switches for industrial environments.
Comparison Table: DIP Switch vs Jumper
| Feature | Jumper (Header & Shunt) | DIP Switch |
| Component Cost | Very Low (<$0.01) | Moderate to High ($0.50+) |
| Ease of Use | Low (Requires tools/dexterity) | High (Finger or pen tip) |
| Field Configurable | No (Difficult) | Yes (Designed for it) |
| Risk of Data Loss | High (Shunts get lost easily) | None (Self-contained) |
| Visual Feedback | Poor (Hard to see connection) | Excellent (Clear ON/OFF) |
| Best Application | Voltage selection, Factory Reset | Address setting, Mode selection |
Reliability in Harsh Environments: Vibration and Dust
Are DIP switches reliable enough for heavy industry? Yes, if you choose the right type. A common myth is that jumpers are better for vibration because they "grip" the pins. While true for basic headers, modern industrial DIP switches are rated for high-g shock and vibration.
The Secret is in the "Detent"
High-quality DIP switches have a positive "detent"—a physical click that locks the actuator in the ON or OFF position. To dislodge it requires significant force, often more than a typical vibration environment produces.
However, oxidation is the real enemy.
- Scenario: An industrial switch sits in a sulfur-rich environment (like a wastewater plant) for 10 years.
- Risk: The contacts inside an open DIP switch might corrode, leading to intermittent connections.
- Solution: For these environments, manufacturers use gold-plated contacts and tape seals (or membrane switches) to prevent air and moisture from touching the contact surface.
Cost Analysis: Is the DIP Switch Premium Worth It?
While the component cost is higher, the "Total Cost of Ownership" often favors the DIP switch.
Imagine you are selling a device for $200.
- Using Jumpers: Saves you $0.50 in manufacturing.
- The Support Call: A customer calls because they lost the jumper while trying to configure the device. Your technical support team spends 20 minutes on the phone ($15 labor cost), and you might have to mail them a replacement shunt ($5 shipping).
- Result: You saved $0.50 to lose $20.
If your device requires any interaction from the end-user, the DIP switch pays for itself in reduced support tickets and improved customer satisfaction.
FAQs: DIP Switches and Jumpers
Yes, technically. Both devices simply close a circuit. If you are retrofitting a board, you can desolder the header pins and solder a DIP switch in their place (assuming the pin pitch is the standard 2.54mm). This is a common "mod" for hobbyists who frequently change settings on development boards.
DIP stands for Dual In-line Package. This refers to the physical shape of the component housing—a rectangular block with two parallel rows of connecting pins. It is the same form factor used for classic integrated circuit (IC) chips.
Yes, provided you use high-retention or rotary DIP switches. Rotary DIP switches, in particular, are extremely vibration-resistant because the internal wiper is pressed firmly against the contact pad. For extreme environments (aerospace/rail), specialized "piano" style switches with stiff actuators are used to prevent accidental switching.
DIP switches are binary.
1. Each switch represents a number (1, 2, 4, 8, 16, 32, etc.).
2. f the switch is ON, you count that number.
3. If it is OFF, you ignore it.
Example: If switches 1 and 3 are ON:
Switch 1 = 1
Switch 3 = 4
Total Address = 5.
Conclusion
The battle of DIP switch vs jumper isn't about which technology is "newer"—it's about the intended user.
If you are building a budget consumer toy or a device where settings should remain frozen forever, the jumper is your cost-effective hero. But for industrial equipment, where downtime is expensive and field technicians need clarity and speed, the DIP switch is the undisputed king.
When selecting hardware for your facility, always check how it’s configured. A device that uses external DIP switches for critical settings is often a sign of a manufacturer that understands the realities of the factory floor.