Beginner’s Guide to DIP Switch Configuration
This beginner guide to dip switch configuration is your roadmap to mastering hardware customization. You don’t need an engineering degree to understand these tiny components. You just need a steady hand, the right tool, and a basic understanding of on/off logic.
Whether you are pairing a garage door remote, setting up an arcade machine, or configuring an industrial sensor, DIP switches are the gatekeepers. We will break down exactly how they work, how to set them safely, and how to troubleshoot them when things go wrong.
What Is a DIP Switch and Why Do We Use Them?
A DIP (Dual In-line Package) switch is a manual electric switch packaged in a standard group. They control signal flow on printed circuit boards without software. Users toggle individual levers to "On" or "Off" positions to customize hardware addresses, frequencies, or operating modes.
The "Old School" Reliability
In an era of touchscreens and Wi-Fi, you might wonder why we still use physical switches. I’ve worked on industrial sites where software fails, but a physical switch remains rock solid.
DIP switches offer distinct advantages:
- Permanence: The settings stay even when power is lost.
- Simplicity: No drivers or updates are required.
- Visual Verification: You can see the setting with your naked eye.
For a deeper dive into how these components fit into larger systems, check out our Industrial Switches Comprehensive Guide. Understanding the ecosystem of switches helps you appreciate why the humble DIP switch is still king in many sectors.
How Do DIP Switches Function Using Binary Code?
DIP switches function on simple binary logic: On (1) and Off (0). By combining these positions across multiple switches, you create a unique numerical code. This code tells the device its specific address or operating mode, allowing multiple devices to exist on one network.
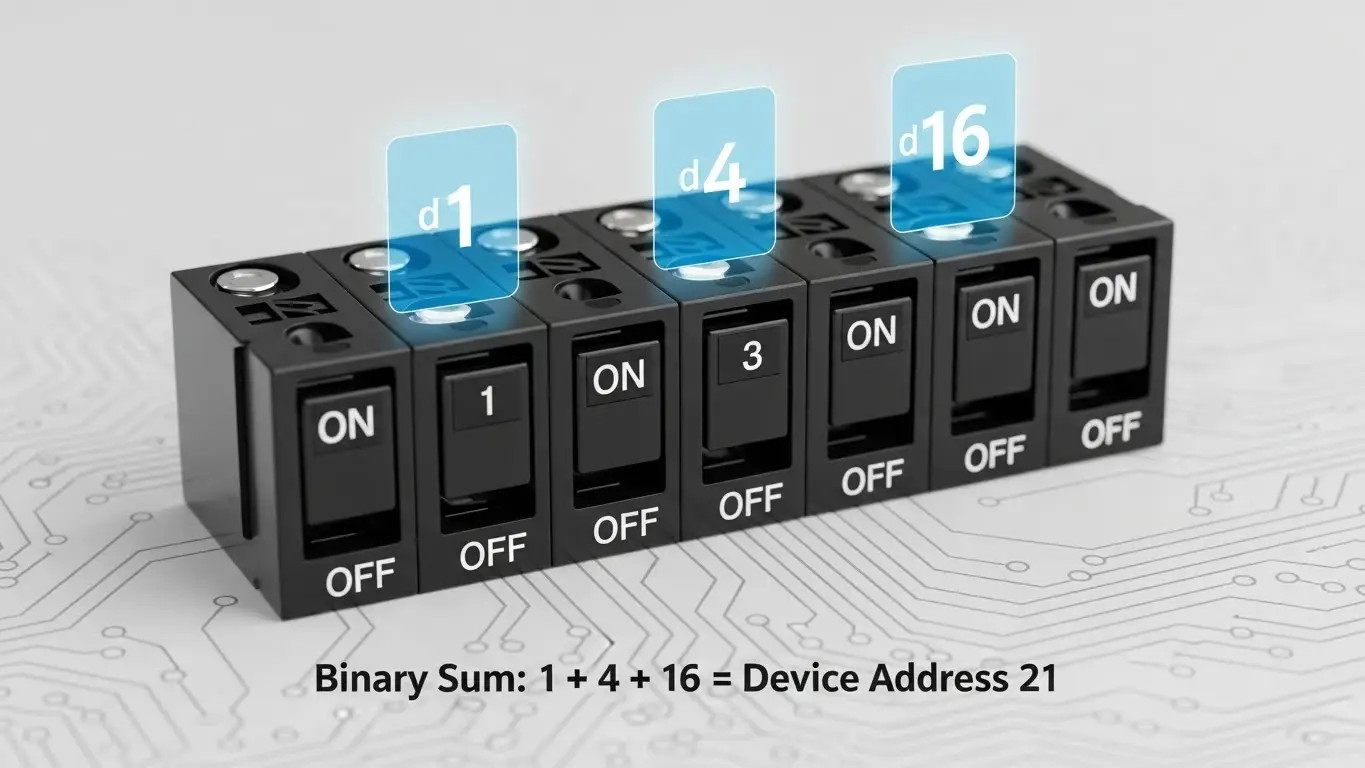
Cracking the Code
You don't need to be a mathematician. Think of the switches as a row of light switches.
- Position 1: usually represents the number 1.
- Position 2: usually represents the number 2.
- Position 3: usually represents the number 4.
It follows a $2^n$ pattern. If you turn on switches 1 and 3, the device reads it as $1 + 4 = 5$. This is how a garage door opener knows your remote is the one calling, not your neighbor's.
| Switch Position | Binary Value | Decimal Value (if On) |
| 1 | $2^0$ | 1 |
| 2 | $2^1$ | 2 |
| 3 | $2^2$ | 4 |
| 4 | $2^3$ | 8 |
| 5 | $2^4$ | 16 |
| 6 | $2^5$ | 32 |
| 7 | $2^6$ | 64 |
| 8 | $2^7$ | 128 |
Pro Tip: Always check the device manual. Some manufacturers invert the logic, where "On" equals 0.
What Tools Do You Need for Safe Configuration?
To configure a DIP switch safely, use a specialized non-conductive tool like a plastic spudger or a dedicated DIP switch stick. Avoid using graphite pencils, as graphite dust is conductive and can short-circuit the board. A magnifying glass is also helpful for reading tiny labels.
My "Graphite" Mistake
Years ago, I used a mechanical pencil to flip a switch on a motherboard. A tiny shard of lead broke off and bridged two contacts. The result? A puffed capacitor and a dead board.
Essential Toolkit:
- Plastic Stylus: Prevents scratches and shorts.
- Magnifying Glass: These switches are incredibly small.
- Fine-Point Tweezers: Good for "Piano" style switches.
- Datasheet: Never guess the configuration.
How To Configure DIP Switches Step-by-Step?
Follow these steps: 1. Power down the device completely. 2. Locate the DIP switch block. 3. Consult your manual for the required code. 4. Use a non-conductive tool to toggle switches. 5. Double-check positions against the diagram. 6. Power the device back on.
Detailed Walkthrough
- Safety First: Always unplug the device. While DIP switches are low voltage, the board they sit on might not be.
- Identify the Orientation: Look for the word "ON" or a dot indicating pin 1. If you read the switch backward, your code will be wrong.
- The Toggle: Move the actuator firmly. You should feel a distinct "click" or tactile bump. If the switch floats in the middle, the connection is intermittent.
- Verification: This is crucial. Read the code out loud. "One is up, Two is down, Three is up."
- Test: Power up. If it doesn't work, power down before changing settings again.
If you are dealing with complex machinery, proper setup is vital. You can read more about heavy-duty setups in our Industrial Switches Comprehensive Guide to ensure you aren't overlooking environmental factors.
What Are the Different Types of DIP Switches?
Common types include Slide types (standard toggle), Rocker types (pivoting actuators), and Rotary DIP switches (dials). Slide switches are most common for simple settings, while Rotary switches allow for easy selection of hexadecimal codes using a small screwdriver.
1. Slide DIPs
The classic look. You slide a nub up or down. They are robust but can be hard to move if the switch is recessed.
2. Piano DIPs
These have levers that stick out like piano keys. They are easier to actuate with fingers but are more prone to accidental bumps.
3. Rotary DIPs
These look like small dials with numbers printed around them. You turn the center slot to point at a number. Internally, the dial creates the binary connection. These are fantastic for setting device IDs quickly without looking up a binary chart.
[External Link Placeholder: Wikipedia - DIP Switch Types]
How to Troubleshoot DIP Switch Issues?
Troubleshooting involves cleaning contacts with isopropyl alcohol, checking for "floating" switches that aren't fully engaged, and verifying the binary calculation. Oxidation can prevent signal flow, so exercising the switch (flipping it back and forth) can often clear the internal contacts.
The "Exercise" Fix
If a device acts erratic, the switch contacts might be oxidized.
- Power down.
- Flip the switch back and forth 5 to 10 times rapidly.
- Reset it to the correct position.This friction scrapes off the oxide layer (self-cleaning).
Common Errors to Watch For:
- Mirroring: You set the code reading left-to-right, but the board reads right-to-left.
- Inversion: You assumed "Up" is "On," but the board manufacturer defined "Down" as "On."
- Debris: Dust entering the switch housing can block the connection. This is why sealed switches are preferred in dirty environments. For more on selecting durable components, refer to the environmental sections in our Industrial Switches Comprehensive Guide.
Frequently Asked Questions
No, you should never adjust DIP switches while the device is powered. Doing so can cause electrical shorts or confuse the device's logic controller, potentially corrupting data or damaging the hardware.
A DIP switch uses a Dual In-line Package (two rows of pins), while a SIP uses a Single In-line Package (one row). DIPs are more common and stable on standard circuit boards, while SIPs save horizontal space.
The number of switches determines the security and frequency channels. More switches mean more possible code combinations ($2^8$ vs $2^{12}$), reducing the chance of interference with other devices.
Final Thoughts on Configuration
Mastering the beginner guide to dip switch configuration opens up a world of hardware control. It empowers you to fix legacy tech, secure your home automation, and understand the binary roots of computing.
Take your time. Use the right tools. Respect the binary logic.
If you are ready to expand your knowledge beyond basic DIPs into the wider world of electromechanical controls, I highly recommend reading our Industrial Switches Comprehensive Guide for a complete overview of switching technology.