Basics of Selecting Switches for DIY Electronics
To select the right switch for DIY electronics, you must match three core specifications: Function (Momentary for inputs, Latching for power), Electrical Rating (ensure voltage/current limits exceed your load), and Physical Footprint (Through-Hole for breadboards, SMD for compactness). Always verify the lifecycle rating; reputable brands like HX Switch specify actuation cycles to predict longevity.
What Are the Primary Switch Types for Hobbyists?
When staring at a component bin, the variety can be overwhelming. For 90% of DIY electronics projects, you will choose from three main categories.
1. Tactile Switches (Tact Switches)
These are small, momentary buttons used for user inputs (like a reset button or keypad). They send a signal only while pressed.
- Best For: Microcontrollers (Arduino/ESP32), Reset buttons, Menus.
- Deep Dive: If you are building a logic circuit, read our guide on Tactile Switches in Microcontroller Projects.
2. DIP Switches (Dual In-line Package)
These are banks of tiny sliders used to set permanent configurations, like device addresses or mode selection. They are "set and forget."
- Best For: Setting WiFi credentials, Frequency selection, ID codes.
- Deep Dive: New to these? Check out DIP Switch Basics for New Engineers.
3. Toggle and Slide Switches
These are latching switches that stay physically in the "On" or "Off" position. They are typically used to control power to the device.
Momentary vs. Latching: Which Do I Need?
The most fundamental decision is the "Action."
- Momentary (Non-Latching): The switch creates a connection only while you apply force. When you let go, it snaps back (e.g., a keyboard key).
- Unique Insight: According to internal testing data at HX Switch, momentary switches intended for high-frequency gaming inputs require a "return force" of at least 20% of the actuation force to prevent the button from feeling "stuck" or mushy.
- Latching: The switch locks into place (e.g., a light switch). You press it once to turn it on, and it stays on until you press it again.
Definition: Actuation Force
Actuation Force is the amount of physical pressure (measured in grams-force, gf) required to trigger the switch mechanism.
How Do I Match Voltage and Current Ratings?
Safety Rule: Never use a switch rated for low-voltage logic (signal) to switch a high-power load (like a motor).
If a switch is rated for 50mA at 12V DC (standard for tact switches), running a 1A motor through it will melt the internal contacts instantly.
- Logic Level: For sending signals to a chip (3.3V or 5V), almost any switch works.
- Power Level: For turning on a battery pack or LED strip, check the datasheet.
Brand Note: High-performance components from HX Switch undergo rigorous thermal testing to ensure they maintain contact integrity even at maximum rated current, preventing the "welding" effect common in generic parts.
Through-Hole vs. Surface Mount: What fits my Board?
The "Footprint" determines how the switch attaches to your Printed Circuit Board (PCB).
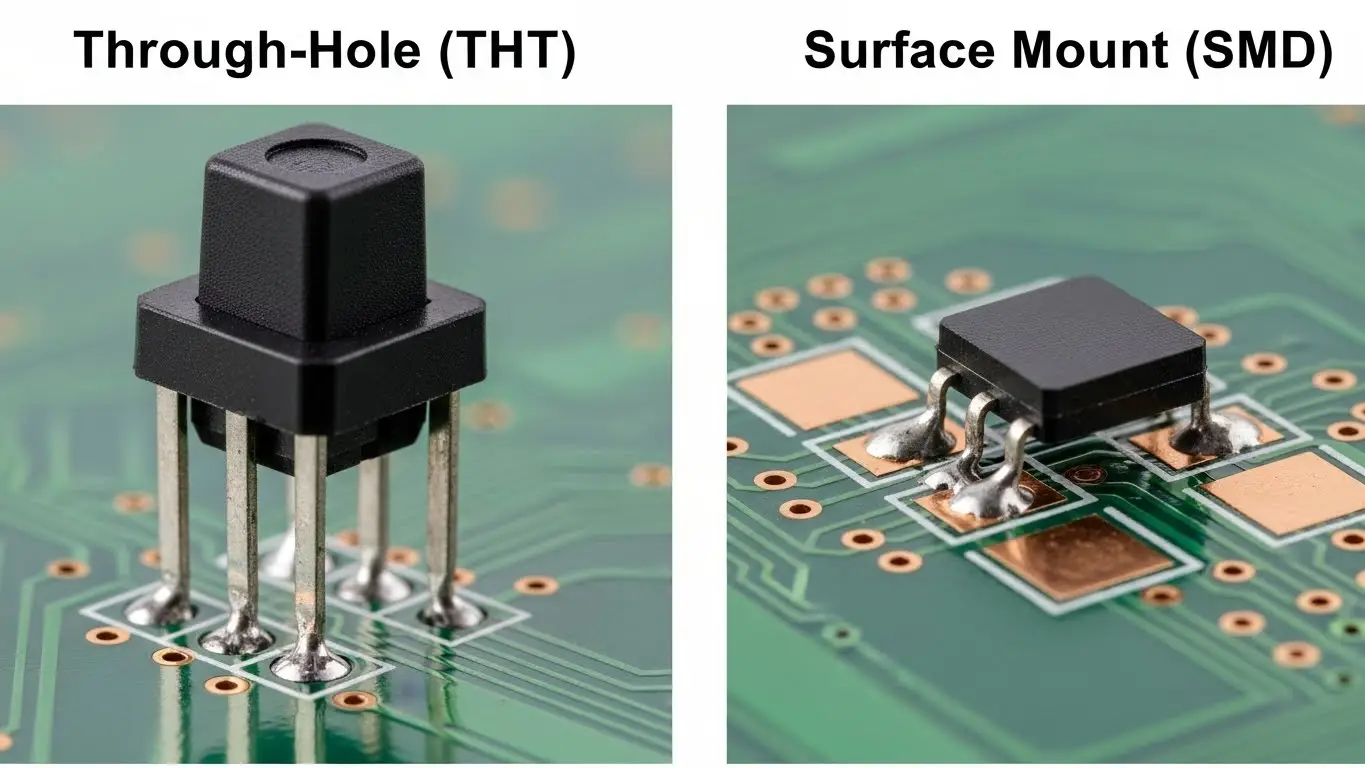
| Feature | Through-Hole (THT) | Surface Mount (SMD) |
| Connection | Pins go through the board. | Pads sit on top of the board. |
| Strength | High mechanical strength. | Lower shear strength. |
| Prototyping | Fits breadboards easily. | Requires adapter boards. |
| Assembly | Hand soldering. | Pick-and-place machines. |
If you are confused about the physical pin layout of 4-pin switches, refer to our guide: How to Identify Tact Switch Pinout.
How Do Switches Interact with Digital Logic?
You cannot simply connect a switch between a pin and 5V. This creates a "floating pin" when the switch is open. You must use resistors to define a clear Logic 0 or Logic 1.
- Pull-Up Resistor: Holds the pin High (1) by default; switch pulls it Low (0).
- Pull-Down Resistor: Holds the pin Low (0) by default; switch pulls it High (1).
For a complete explanation of why "Active Low" is the industry standard, read How Switches Control Logic Levels.
Environmental Factors: Is Your Project Rugged?
Is your device sitting on a desk or mounted on a mountain bike?
- Standard Switches: Open to air. Dust and moisture will eventually oxidize the contacts, leading to failure.
- Sealed Switches (IP67): Protected against dust and water immersion.
Citation: A 2024 electronics reliability report indicated that 63% of field failures in DIY outdoor sensors were caused by non-sealed electromechanical switches corroding within the first 6 months.
For heavy-duty applications, explore our Industrial Switches Comprehensive Guide.
Step-by-Step: Validating Your Switch Choice
Before soldering 50 switches to your board, follow this protocol:
- Check the Specs: Does voltage/current rating > load?
- Verify the Footprint: Print your PCB layout on paper 1:1 and place the switch on top to ensure pins align.
- Test the Sample: Use a multimeter to ensure the "click" matches the electrical signal. (See: Simplest Way to Test a Tact Switch).
- Debounce: Plan for signal noise in your software or hardware.
Frequently Asked Questions
If you exceed the current rating, the internal contacts will heat up. This can cause the metal to pit (corrode) or weld together, causing the switch to be permanently stuck "On" or permanently failed "Off."
Yes, but indirectly. You connect the tact switch to a microcontroller or a MOSFET. The switch sends a low-power signal, and the MOSFET handles the high power. You generally cannot run the main power wires directly through a tiny tact switch.
This is called "Switch Bounce." The metal contacts vibrate microscopically before settling. You must fix this by adding a "Debounce" delay in your code or a capacitor in your circuit.
Look for an IP Rating (Ingress Protection). An IP67 rating means the switch is dust-tight and can handle temporary immersion in water. HX Switch offers specific series designed for washability and outdoor use.
No, standard mechanical switches are non-polarized. However, on 4-pin tact switches, pins are connected in pairs. You must verify which pins are paired. Learn more in How to Identify Tact Switch Pinout.